• Welcome to The SAHM Survival Guide!
  • Disclosure | Privacy
  • Cookie Policy
  • Sponsorship
  • Home

Tips, activities and encouragement for staying at home and joyfully surviving it.

  • Shop
    • Activity Resources
    • Organization
    • Self Help
  • Home
  • Real Motherhood
    • Parenting
    • Encouragement
    • Me time
    • Faith
  • Infants
    • How to Teach an Infant Activity: Free Download
    • Infant Activities
  • Toddlers
    • How to Teach a Toddler Activity: Free Download
    • Toddler Activities
  • Preschool
    • How to Teach a Preschool Activity: Free Download
    • Preschool at Home Curriculum
  • School Age
    • School Age Activities
    • Complete Guide for Stay-at-Home Moms: Homeschooling Resources
  • Homemaking
    • Successful Mom Daily Checklist
    • Cleaning Tips
    • DIYs
    • No-Stress Guide to Planning for the Holidays
    • Organization
    • Quick Tips
    • Recipes
  • Subscriber’s Only
    • Success Tools for Stay-at-Home Moms
    • Subscriber Freebies
Home » activities » Peek-A-Boo Boxes: DIY Personalized Toy for Babies

Peek-A-Boo Boxes: DIY Personalized Toy for Babies

Peek-a-Boo Boxes for babies are DIY toys made from a cardboard box or wipes container to encourage fine motor skills and object permanence in infants 4 months and up.

Finding activities to occupy your infant can be tricky. Not all activities listed as “for baby” are really appropriate for children younger than 1 year old. This DIY personalized toy for babies is perfect for infants who are able to hold onto toys and are beginning to use their fine motor skills to grasp. A good age range for this activity is 4 months and up, but you know your child best and babies as young as 2 or 3 months will be stimulated by just looking at the pictures in this DIY toy.

Peek-a-Boo boxes teach babies what their name looks like, and helps encourage self-awareness and object permanence using their own photo. It is not complicated to create. It will take you 10 minutes to put this Peek-A-Boo Box DIY toy together. That is it! 

I am sharing two different ways to make this depending on what supplies you have at home.

DIY Personalized Toy for Babies

Supplies for making the DIY toy Peek-a-Boo boxes.

Supplies Needed:

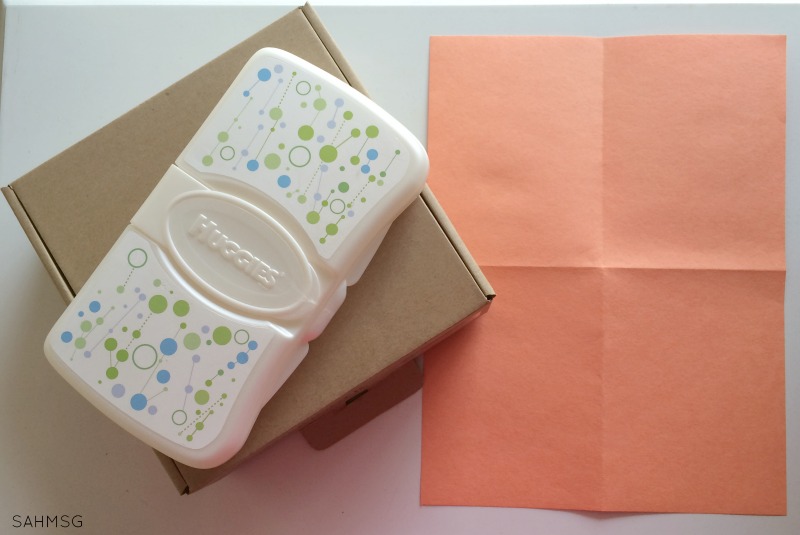
small cardboard box with a flap that opens on top OR travel wipes container

1 sheet of construction paper

black marker

packing tape

1-2 photos of your child


Make the Peek-a-Boo Boxes (cardboard box version)

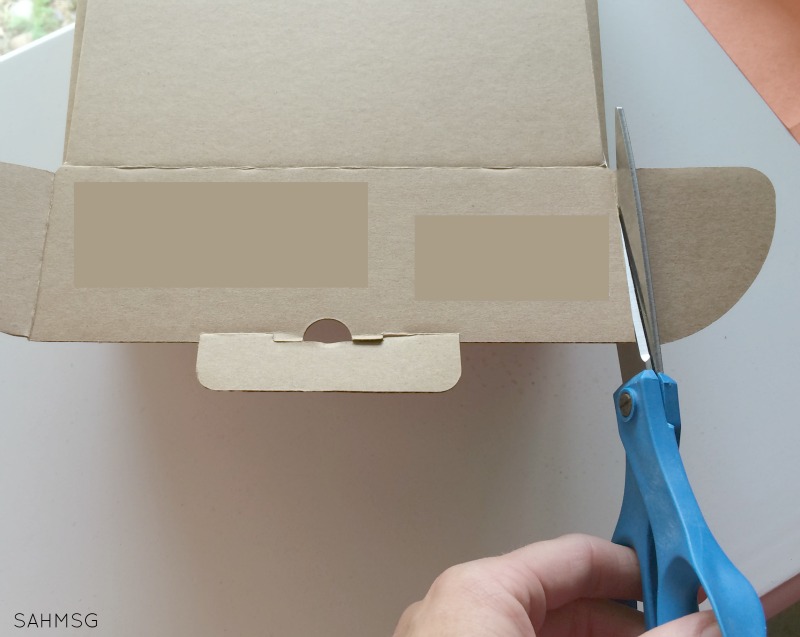
Start by trimming any extra flaps from your box. A baby has to be able to open and close the top, so it has to be easy to open.

Peek-aboo box DIY toy for babies.

Fold your construction paper into 4 sections, or quarters. Cut the 4 sections apart.

DIY toy for babies: Peek-A-Boo box.

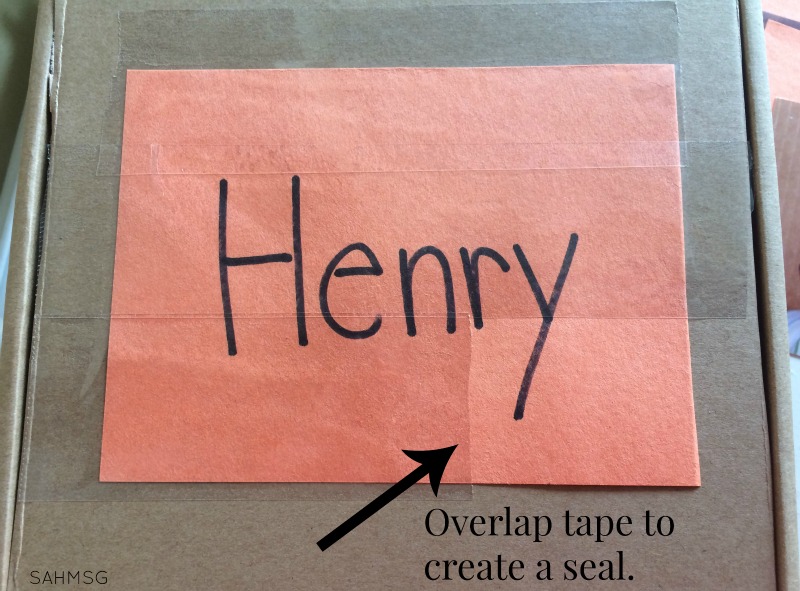
Write your infant’s name on one piece of the paper and tape that piece to the top of the box. Overlap pieces of packing tape to cover the entire piece of paper.

DIY toy for infants: A peek-a-boo box.

Tape a photo of your child to the other piece of paper. A photo 3 1/2 x 5 inches works well-depending on the size of the box that you are using.

Peek-a-Boo Box DIY toy for infants.

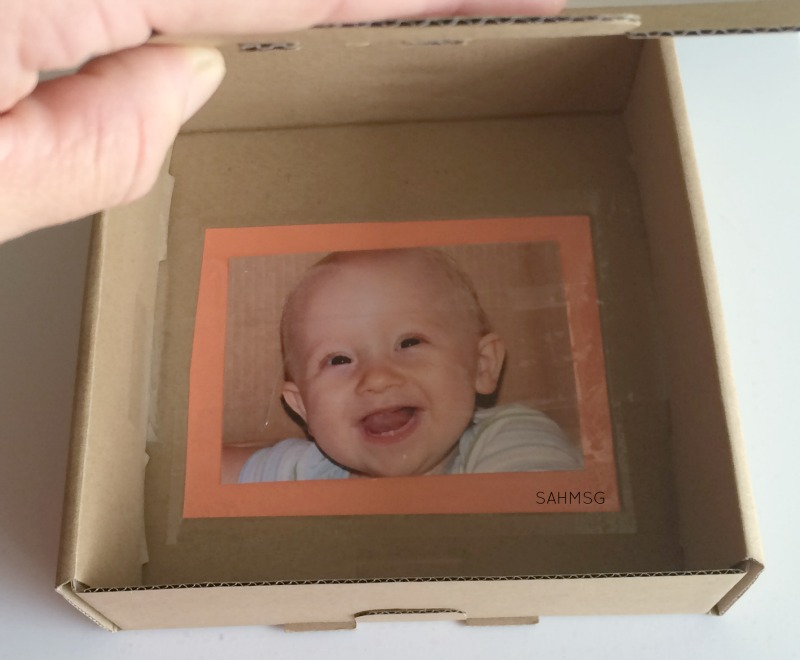
Tape the photo on the inside of the box. If you want to use more than one photo, tape the other one under the flap so baby can see two photos when they open the box.

Be sure to overlap the packing tape across the paper so that no paper is uncovered. You want this to be water-tight, or as much as it can be. Babies tend to put things in their mouths, and the ink on the photos could run if exposed to drool.

Keep reading for how to make Peek-a-Boo boxes out of a travel wipes container.


Super simple DIY toy for babies using a wipes container or small cardboard box.

To Make the Peek-A-Boo Box DIY Personalized Toy for Babies with a Wipes Container

Open the flap of the travel wipes container and press one piece of construction paper into the flap to form the oval shape. This will make it easy to cut out an oval that fits into the flap.

Peek-a-boo box for infants using a travel wipes container. Teaches name, and object permanence.

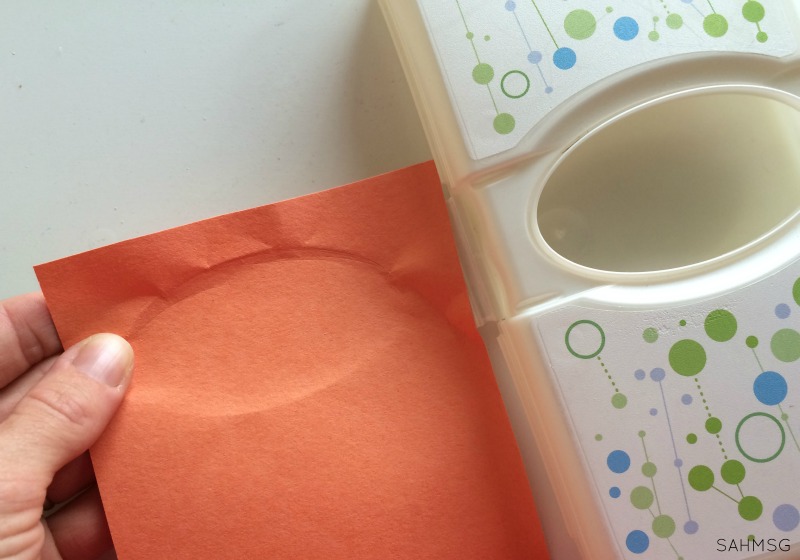
Cut out the oval and write your baby’s name on one side.

Tape the piece of construction paper into the underside of the flap. You will have to tear off smaller pieces of tape to fit them in and overlap them to get a good seal.

DIY Toy for Babies: Personalized Peek-A-Boo Box out of a travel wipes container.

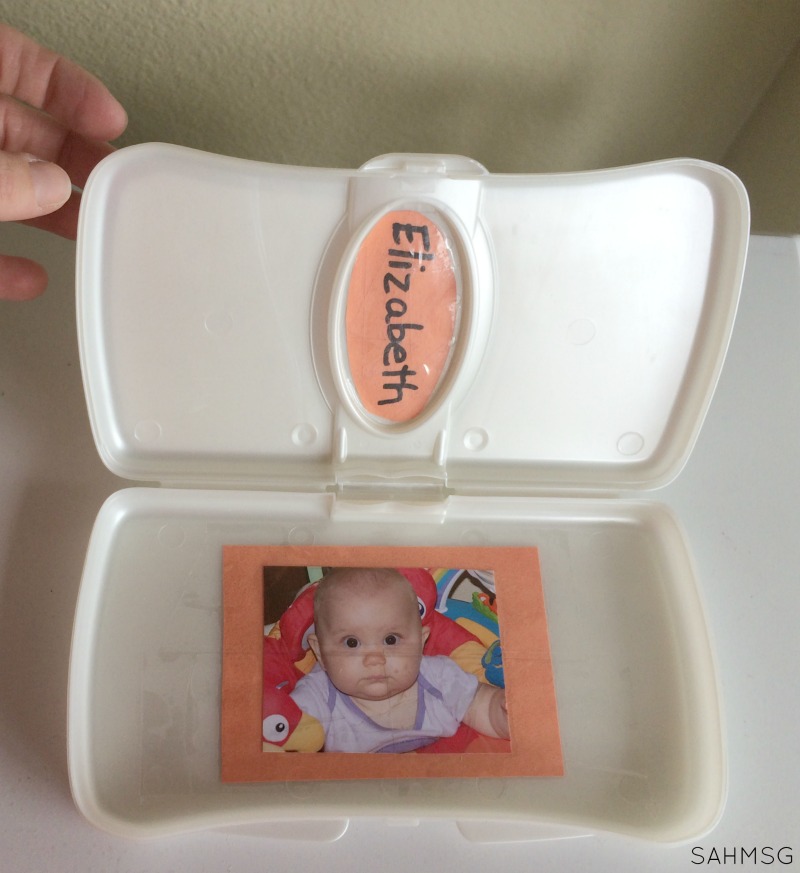
Then, tape a photo of your child (wallet size works well for this version) onto another piece of construction paper to the inside of the wipes container. Again, overlap the strips of tape to keep things as water-tight as possible. Then your baby can play by opening the flap to reveal his/her name and the partial photo, or the whole container.

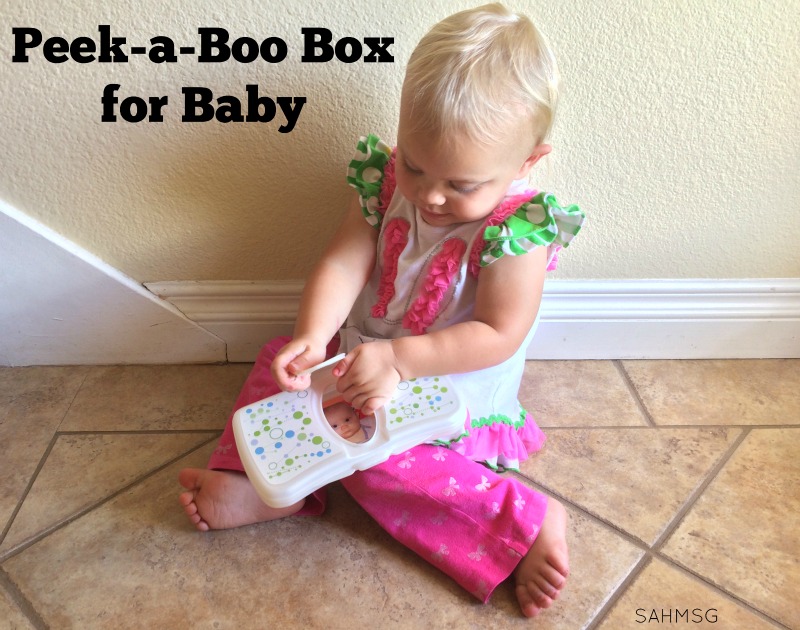
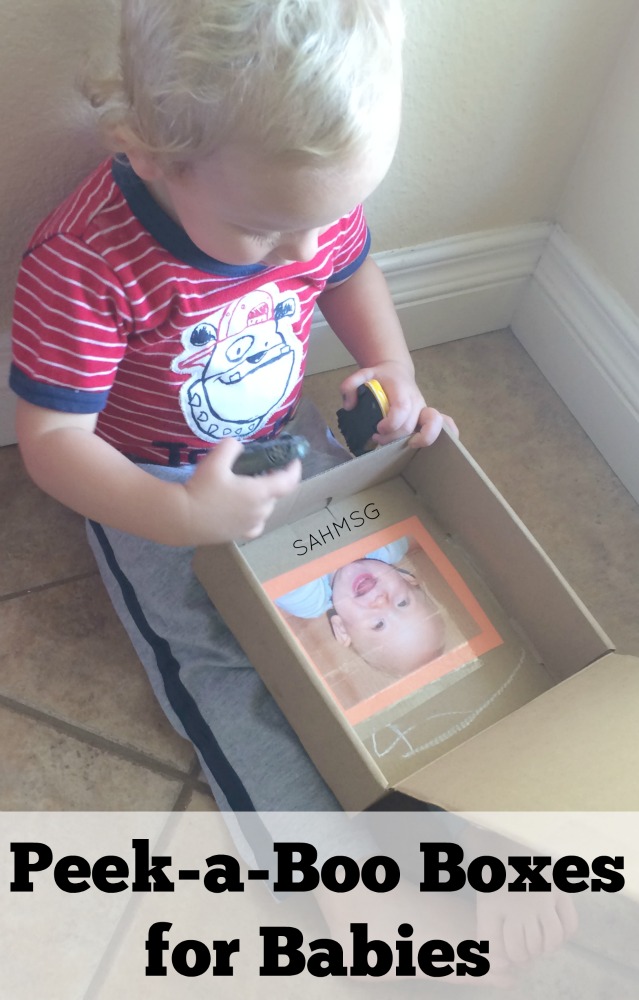
Your baby (or toddler) can open the flap and see their face. I point to their name and say it, then open the box and tell them, “Look, that’s you!”

I guarantee you will get squeals and smiles from your little one with this toy. I have made these for my children, and took a bunch of pictures of the twins with their peek-a-boo boxes when they were around 6 months old. Then, my laptop died-with many photos stored inside. It was not fun, but that is why my now-toddler twins are modeling these peek-a-boo boxes for you! New photos, same idea we used when they were babies.

Simple DIY toy for infants-Peek-a-Boo boxes made from a wipes container or cardboard box teaches fine motor and object permanence skills to infants from 4 months and up.

Your DIY Personalized Toy for Babies is complete. Your infant will enjoy seeing their own face inside the box. This is a good way to expose your baby to print and specifically their name. Learning starts even in the infant stage of child development. Don’t forget to sing the Name Song in my Personalized Songs that Teach  post as your infant explores their new Peek-Boo Box!


What DIY toys have you made for your baby? 

Looking for more DIY toys for infants?

DIY blocks with Family Pictures

DIY Tray Table and Shakers

DIY Jumbo Building Blocks

Successful Mom Daily Checklist to help you gain balance between housework and play time with the kids. Get more done, and feel more successful as a mom and homemaker.

Enjoy your time at home!

Your Name

November 10, 2015 by Jaimi Erickson 7 Comments Filed Under: activities Tagged With: baby, cardboard, crafty, DIY, DIY toys

Comments

  1. Ayelet says

    July 13, 2016 at 4:09 am

    Great idea – love this activity as it supports so many areas of development – communication, social/emotional, fine motor, cognitive… my kind of activity!
    Thanks for the great post,
    – Ayelet from Strength In Words

    Reply
    • Jaimi says

      July 13, 2016 at 12:28 pm

      Generally speaking, it is multi-tasking with all the learning that can happen! LOL! I love when activities come together like that. Thanks for stopping by, Ayelet.

      Reply

Trackbacks

  1. Winter Boredom Busters for Infants - The Stay-at-Home-Mom Survival Guide says:
    January 6, 2022 at 6:53 pm

    […] babies loved the surprise they saw in these Peek a Boo boxes that are easy to […]

    Reply
  2. Invitations Blog says:
    March 13, 2018 at 11:25 pm

    Peek A Boo Baby

    […] ling these peek-a-boo boxes for you! New photos, same idea we used when they wer […]

    Reply
  3. Hanger Scale DIY Toy - The Stay-at-Home-Mom Survival Guide says:
    March 7, 2017 at 2:03 pm

    […] Peek-Boo Boxes  […]

    Reply
  4. Peek a boo boxes – Temp Mad says:
    January 24, 2017 at 10:34 pm

    […] Peek-A-Boo Boxes: DIY Personalized Toy for Babies […]

    Reply
  5. 14 DIY Baby Toys - Moms and Crafters says:
    July 6, 2016 at 3:31 am

    […] Young toddlers will love these Peek-a-boo Boxes by The Stay-at-Home Mom Survival […]

    Reply

Leave a Reply Cancel reply

Your email address will not be published. Required fields are marked *

This site uses Akismet to reduce spam. Learn how your comment data is processed.

Free gifts for email subscribers to The Stay-at-Home Mom Survival Guide.


Over 80 simple learning activities for preschool age kids to explore and play while learning.
Try these for playtime with your baby! These infant activities are perfect for quick moments of interaction that are developmentally appropriate for infants.


Recent Posts

  • Tips to Stay on Budget When You Have Kids
  • How to Mix and Match Different Styles of Furniture
  • 10 Multi-Age Activities to Encourage Your Kids’ Curiosity
  • How to Balance School and Home Repairs: Tips to Manage Both
  • Child’s First Book Report: The Story Rope

Popular Topics

You may find Amazon affiliate links on this page. I can earn a percentage when you make a purchase through these links. This does not imply endorsement from Amazon or its affiliates.

Copyright © 2023 · Magazine Pro Theme on Genesis Framework · WordPress · Log in

©The Stay-at-Home-Mom Survival Guide – Jaimi Erickson

HOME | ABOUT | DISCLOSURE/PRIVACY | SPONSORSHIP