Making your own baby food allows you to buy in bulk, cook large batches and store in bulk. For me this means less running to the store and less expense. Don’t have an infant? Read on for an amazing tip for moms of toddlers and preschoolers, from a fellow mom and reader of this blog, to make your own pureed food snack pouches! Simple, easy snack idea.
I really enjoyed the time-saving, money-saving and nutritional benefits of making my own baby food for all four of my children. With my oldest, for a time, I had to purchase baby food after having major surgery, and for the twins I purchased food as well while we were on the road moving from Virginia to California, but making baby food is what I prefer.
There are many homemade baby food resources out there-
books,
websites and blogs-I just do my own thing.
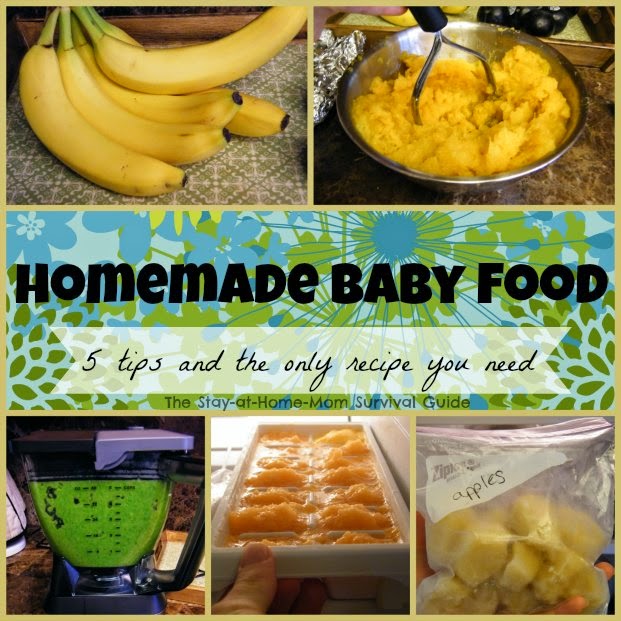
Simple Homemade Baby Food
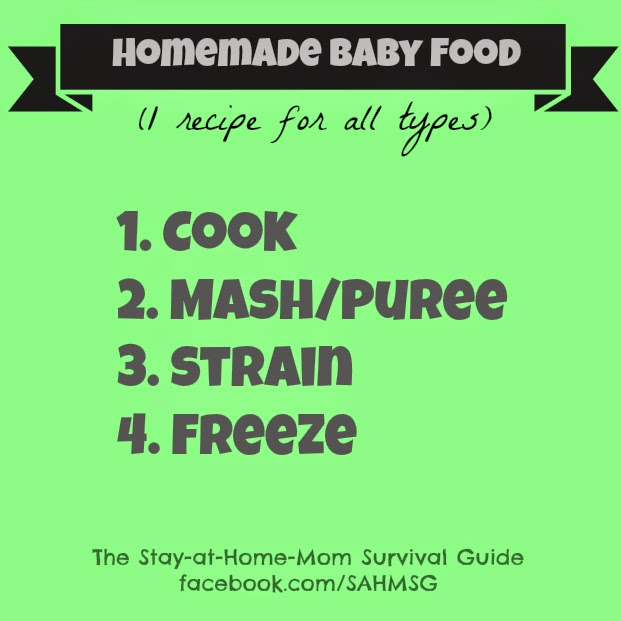
My main recipe is: cook, mash/puree, strain, freeze. Cooking methods can be roasting, baking, sauteeing, poaching or even using the microwave.
Here is a list of baby foods I have made and how I did it:
Peaches, Pears, Apples, Plums, Blueberries, Apricots:
Cut into wedges (except berries), peel, and cook in a saucepan on low until broken down and a fork easily passes through a chunk. Remove from heat, cool slightly and pour into food processor or blender. (If you do not have a food processor, just use a potato masher or a fork.)
After blending well, pass through a wire strainer. Pour into ice cube trays (1 cube is about a tablespoon) and freeze. Cubes are ready to pop out after a few hours. I store the cubes in zip top bags labeled with the type of food and date.
Squash:
Cut in half and scoop out seeds. Fill a glass baking pan with water 1/4 to 1/2 inch deep. Place squash flesh side down in the water. Bake at 350-375 until tender. In my oven this takes about 20 minutes.
Remove from oven, cool slightly and scoop out flesh from rind. Place in food processor, blend, strain, then freeze in ice cube tray.
Sweet Potatoes:
Pierce each potato with a fork 2-3 times and wrap each potato in foil. (I baked 3 and it made a lot.)
Bake until soft, cool and remove foil. Carefully cut in half and scoop out flesh from skin. Mash then pass through a metal strainer in batches. Freeze.
Broccoli, Peas, Green beans, Carrots:
I buy these frozen in bulk. I fill a microwavable bowl with the vegetable and heat thoroughly. Cool slightly, process, strain and freeze.
Banana, Avocado:
Peel, mash with fork or in food processor, then eat. I do not freeze these because they are so easy to mash up and use immediately. You can microwave them briefly if you would like them to be slightly cooked, but just be sure to test the temperature by tasting the food before feeding so baby does not get burned.
Meats:
I have only made chicken into baby food, and all I do is bake it or poach it, then pick the meat off any bones. Then I place the meat into the blender and slowly drizzle water into the processor until a loose paste forms. These can be frozen in the ice cube trays too.
5 More tips:
1.) For a semi-homemade version, buy canned fruits and vegetables and just drain off liquid, rinse well and puree. This eliminates the cooking step, but still is less expensive than buying baby food.
2) Before your baby has tried a variety of foods, make sure your cooking utensils and appliances are cleaned after each food is made. A little bit of squash left when you make peaches could complicate matters if your child has a reaction when eating the food-you won’t easily know if the squash or peaches are causing the problem.
3) I stop straining the pureed or mashed foods between 7 and 9 months. At this age, my children have tried enough varieties of foods that I want them to start being introduced to food textures as well. Just watch for any larger stringy or chunky pieces to avoid choking hazards. If your baby is not ready for more textures at this age, then just wait.
4) You don’t need to have a baby to utilize these pureed foods.
Use this method to add extra veggies into soups and sauces-many picky eaters have issues with textures and the pureed foods solve that by allowing you to sneak foods into sauces or casseroles-add a puree to chili, bean soup, spaghetti sauce, or lasagna. (I am all for children just having to eat what you make whether it is hidden or not!)
Have toddlers or preschoolers?
Then this tip from Cari H., a mom who reads this blog, is perfect for you:
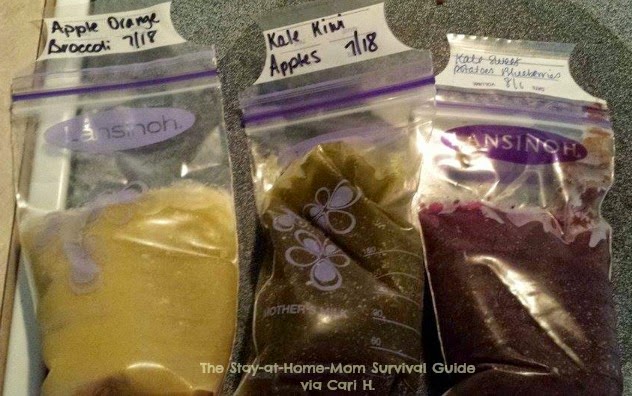
5.) Make your own food pouches! All you do is place pureed foods (single or mixtures) into breastmilk storage bags and refrigerate or freeze until ready to use. Thaw, open zip top (if you use
Lansinoh breastmilk storage bags) and place a straw into the bag. Close the zipper around the straw and you have an instant snack on the go that is mess-free! How cool is that? (NOTE: Be sure that the consistency of the pureed food is thin enough to pass through a straw!)
I want to send a big thank you to Cari for sharing this tip (and her photo) on the SAHMSG
Facebook page. I am so glad that she was willing to let me share it with you. We were sharing our homemade baby food tips recently. Did you miss it? Head on over
here to ‘like’ and follow along. You may also want to join the only group for SAHMSG moms:
Moms Share Together on Facebook.
How did your attempts at making baby food go?
Have any good ideas for food combinations or tips of your own?
Leave a comment below so we can all share.
This post was featured in A Complete Guide for Stay-at-Home Moms: Feeding and Caring for Baby.
When Moms Share together we grow in motherhood!


Thanks for amazing content. I think it is very helpful for new born babies.The post is very informative and creative. I Loved it.Carry on
I am so glad to know it was helpful. 🙂
We need crucial instructions before choosing foods for our babies. Most probably we need hygienic, nutritious foods which consist of protein, vitamin and other essential ingredients. Instead of purchasing foods from outside it is quite better to give our baby homemade foods; here we can get some important instruction on how to prepare baby foods in home with essential healthy ingredients.
Thanks, Glenn. Homemade baby food is so nutritious-and less expensive than store bought!
I love the idea of the food pouches! How clever – this would be great for traveling on long trips or for snacks during sporting events.
Great ideas, Anne! Those food pouches are so handy. It was a great idea from, Cari. I am so glad she let me share here. Take care!
Thanks for sharing this. For some time, I was able to take care of my nieces and nephews when they were still babies and I made it a point to offer them natural foods only. I would have tried your suggestions especially the food pouches — looks like it is the ingredient to no mess feeding! 🙂
What a blessing you must have been to your family to care for your nieces and nephews! I am so glad that Cari shared the food pouch idea and let me share it-she is one clever mama! All the best to you, Mirtha!
Great post and perfect timing! My daughter is 5 month now and we soon will start with solids.
I am so glad to know that you can use these tips! My twins are not much older than your daughter. Enjoy the time with her while she is so little. 🙂